

Table of Contents
- Why Renovation Dust Spreads Further Than You Think
- How to Seal Off a Room During Renovation
- Room-by-Room Containment Plan for Occupied Homes
- Best Air Purifier for Construction Dust: Filter Ratings and Placement
- How to Clean Drywall Dust Without Spreading It
- How Long Does Renovation Dust Last?
- Dust Control by Renovation Task and Material
- Daily Maintenance and Final Cleaning Sequence
- Frequently Asked Questions
Last Updated: October 5, 2026
Why Renovation Dust Spreads Further Than You Think
Renovation dust travels far beyond the room you’re working in, riding air currents through doorways, HVAC vents, and gaps around trim into rooms you never touched.
At KRB Development, we’ve managed remodeling projects since 2005, and the lesson on how to manage dust during home renovation is always the same: dust control starts before demolition, not after. If you’re learning how to manage dust during home renovation, understand this first.
Three things push dust through a home:
- Air pressure. Running HVAC systems pull dust into ducts and spread it room to room.
- Foot traffic. Every trip in and out of the work area carries particles on shoes and clothes.
- Fine particles. Drywall dust and sawdust stay airborne for hours before settling.
Plan for containment first. Cleaning comes second.
How to Seal Off a Room During Renovation
Sealing off a room means building a temporary barrier at every opening, then controlling the air inside it to keep most dust out of your living areas.
Plastic Sheeting, Zipper Doors, and Sealing Gaps
Hang 4- to 6-mil plastic sheeting over each doorway and tape it floor to ceiling. For doorways you’ll use daily, install a zipper door so you can pass through without tearing the barrier down.
Then seal the gaps people forget:
- Tape over door hinges and handles
- Cover return air vents inside the work area
- Seal gaps around baseboards and outlets
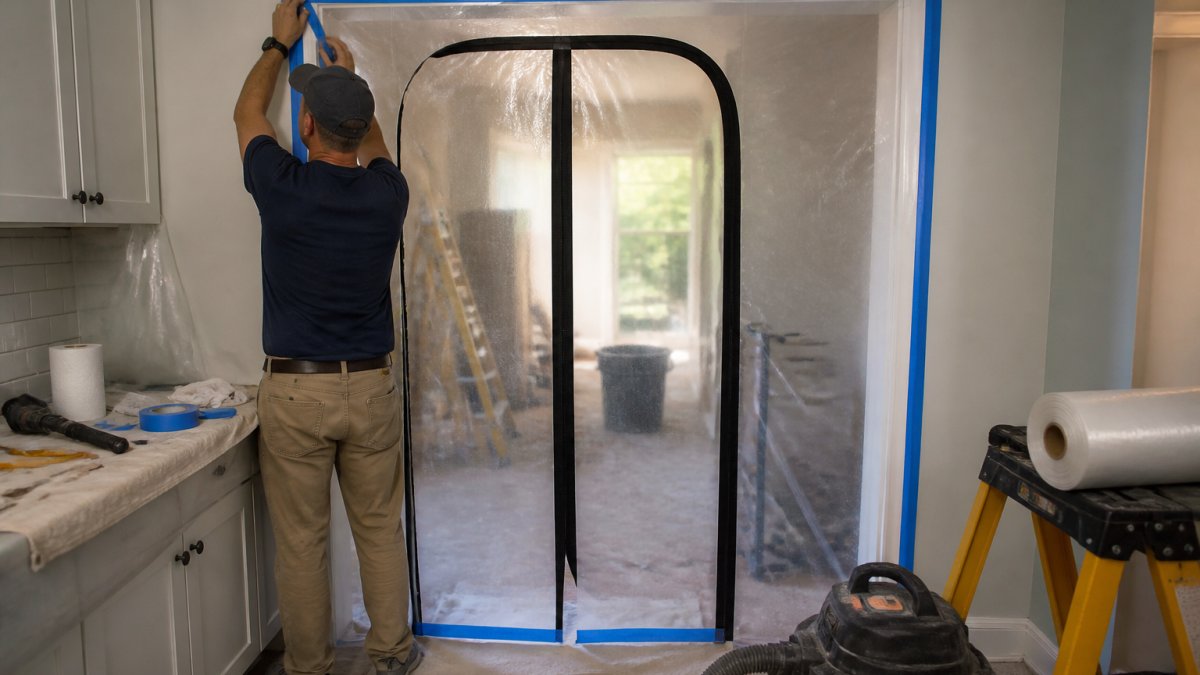
Protecting HVAC Vents and Air Circulation
Turn off the HVAC system serving the work zone before demolition and cover supply and return vents with plastic and tape, keeping dust out of ducts where it can recirculate for months. If you need airflow, open a window in the work area and place a box fan blowing outward to create negative pressure.
Running your central air during demolition is the fastest way to spread dust through every room. One afternoon of sanding with the HVAC on can coat your entire home in fine dust.
Room-by-Room Containment Plan for Occupied Homes
Living in the house during a remodel changes the plan: you’re protecting the rooms you still use every day. Here’s our sequence:
- Work area: Full plastic barrier, sealed vents, negative air, no exceptions.
- Adjacent rooms: Close doors, tape the seams, roll up rugs, and cover furniture with plastic drop cloths.
- Kitchen and bathrooms: Keep doors shut when not in use. Wipe counters daily.
- Bedrooms: Move bedding into closets or cover it. Run a portable air cleaner if dust is heavy.
- Shared hallways: Lay runners or damp towels along the path from the work zone to the exit.
The goal is a clean path from the work area to the door. If workers walk through your living room, protect that path.
Set up one designated entry and exit for the work crew. Multiple access points multiply the dust trail. We tape off every other route before the first day of demo.
Best Air Purifier for Construction Dust: Filter Ratings and Placement
The best air purifier for construction dust uses a HEPA filter rated H13 or higher, capturing 99.97% of particles at 0.3 microns, including drywall dust and most sawdust. But the rating is only half the decision, the unit must also move enough air and sit where it can capture dust before it escapes.
What to look for
Filter ratings matter more than brand names. Look for:
- True HEPA (H13 or H14): Captures fine particles that standard filters miss. “HEPA-like” and “HEPA-type” are not the same rating.
- High CADR: Clean air delivery rate matched to your room size. A unit that is too small will run constantly and still lose ground.
- Pre-filter: Catches large debris so the HEPA filter lasts longer. On dusty jobs, check it daily.
Placement: inside the work zone, not the room you are protecting
This is the most common mistake. A purifier placed in a clean room pulls clean air through the filter and leaves the dust where it is. Put the unit inside the work area, near the dust source, so it captures particles at the point of generation.
- Work area: One unit near the dust source, running continuously during work and for several hours after.
- Adjacent rooms: A second, smaller unit if dust is heavy or the barrier is not perfect. This is a backup, not a substitute for containment.
- Do not place a purifier in the path of a fan blowing outward. The fan is moving air out; the purifier is trying to clean it. They fight each other.
Air scrubbers vs. portable purifiers
Air scrubbers move far more air than portable purifiers and connect to ducting for negative pressure, the professional job-site standard. Portable HEPA purifiers suit smaller projects, single rooms, and overnight cleaning.
| Setup | Best For | Key Feature | Where to Place It |
|---|---|---|---|
| Air scrubber | Whole-room remodels, drywall work | High airflow, ductable | Inside work area |
| Portable HEPA purifier | Small projects, occupied rooms | Quiet, moveable | Near dust source |
| Box fan + filter | Budget containment | Low cost, simple | Blowing out a window |
For a full-home remodel or anything involving drywall, an air scrubber in the work zone plus a portable unit in adjacent living space is the combination that works. With a box fan and filter, tape the filter to the intake side and seal the edges, an unsealed filter lets most air bypass it.
How to check whether dust is escaping
Equipment only helps if it’s working. Check containment daily:
- Look at the barrier. Tears, lifted tape, and gaps at the floor are the most common leaks. Reseal before work starts.
- Check the entry path. If dust is collecting outside the barrier, the barrier is not sealed or the entry is being used incorrectly.
- Watch the air cleaner’s pre-filter. A filter that stays clean after a day of sanding means air is not reaching it.
How to Clean Drywall Dust Without Spreading It
Drywall dust is the hardest to remove because it’s so fine. Wiping it with a dry cloth just pushes it back into the air.
Clean it in this order:
- Let it settle. Wait a few hours after sanding.
- Vacuum first. Use a HEPA vacuum on floors, then low surfaces. A shop vac without a HEPA filter will blow dust back out.
- Wipe with a damp cloth. Change the water often. Rinse, don’t smear.
- Work top to bottom. Ceilings and walls first, then counters, then floors.
- Repeat. Drywall dust takes two or three passes.
Never use a standard broom on drywall dust. It launches particles into the air where they can drift for hours.
How Long Does Renovation Dust Last?
Renovation dust can linger for weeks after the work ends if you don’t clean properly. Airborne dust settles within days, but dust trapped in ducts, upholstery, and carpets keeps resurfacing whenever air moves.
Get a Free Project Estimate – Contact Us Today →
Expect this timeline:
- During work: Constant dust. Containment keeps it in the work zone.
- First 48 hours after: Most airborne particles settle.
- First two weeks: Residual dust appears on surfaces. Daily wiping helps.
Change your HVAC filter after the project and consider a duct cleaning if dust was heavy. That step alone shortens how long renovation dust lasts in your home.
Dust Control by Renovation Task and Material
Different tasks produce different dust. The control method should change with the particle size, debris volume, and whether the material contains silica or other hazards. Treat this as a decision tree, not a single setup.
Demolition and tear-out
Demolition makes the most debris and largest particles, but it also disturbs settled dust from old finishes. Control it in layers:
- Contain first. Full plastic barrier at every opening, sealed vents, and a designated entry with a sticky mat.
- Protect the floor. Lay rosin paper or house wrap over finished flooring, then plastic over that. Debris bags get heavy and tear thin plastic.
- Work in small sections. Knock down one wall or one cabinet run at a time so debris stays manageable.
Drywall sanding and finishing
Drywall dust is the hardest to contain because particles stay airborne for hours and pass through cheap filters. This task decides whether the rest of the house stays clean.
- Use a pole sander with a vacuum attachment or a wet-sanding sponge for the final pass. Wet sanding trades a little drying time for a large drop in airborne dust.
- Run an air scrubber or HEPA purifier inside the work zone and keep it running for several hours after sanding stops.
- Vacuum with a HEPA vacuum before wiping. A dry cloth or broom just moves the dust back into the air.
Tile, stone, and concrete cutting
These tasks produce crystalline silica dust, a health hazard, not a cleaning nuisance. The controls differ:
- Wet cutting is the first line of defense. A wet saw or a continuous water feed keeps dust out of the air at the source.
- If dry cutting is unavoidable, use a shroud and a vacuum rated for silica. A standard shop vac without a HEPA filter will exhaust fine silica back into the room.
- Follow OSHA silica guidance for exposure limits and housekeeping. OSHA silica dust guidance for construction
Wood sanding and sawing
Sawdust is coarser than drywall dust but clogs filters quickly and is a fire hazard when it piles up.
- Use a pre-filter on your air cleaner and check it daily. Sawdust loads a filter fast.
- Connect power tools to a dust extractor when the tool has a port. This captures dust at the cut instead of letting it drift.
- Empty the extractor before it is full. A full bag reduces suction and lets dust escape.
Plumbing, electrical, and small wall cuts
These tasks make less dust but still open wall cavities and release insulation and old dust.
- Tape plastic directly under the cut and fold it up as you work.
- Use a vacuum held at the cut line to catch debris as it falls.
- Seal the opening before you leave for the day so dust does not migrate overnight.
Match your dust control to the task, not the room. Drywall sanding needs different tools than demolition, and treating every job the same wastes time and leaves dust behind. The task decides the filter, the vacuum, and the protective equipment.
::: Specialized containment strategies are particularly critical when avoiding floor sanding dust, which requires a dedicated approach to capture fine particulates before they migrate throughout the home.
Daily Maintenance and Final Cleaning Sequence
Dust control is a daily habit, not a one-time setup. Here’s the routine that keeps a home livable during a remodel.
Every day:
- Inspect barriers for tears and reseal them
- Vacuum the work area with a HEPA vacuum
- Wipe the entry path and sticky mats
Every week:
- Wash reusable drop cloths
- Check and change air filters
- Wipe down adjacent rooms
Final cleaning sequence:
- Remove all plastic sheeting carefully, folding dust inward
- HEPA vacuum every surface, top to bottom
- Damp-wipe walls, ceilings, counters, and trim
- Clean floors last, twice
- Replace HVAC filters and clean vents
- Run air cleaners for a full day before moving furniture back
For occupied homes, this final sequence can take a full day or more. Rushing it means dust resettles the moment you turn the air back on.
If the scope is large or involves significant demolition, professional containment is worth it.
Frequently Asked Questions
How do I keep renovation dust out of my HVAC system?
Turn off your HVAC system before demolition starts and seal every supply and return vent in the work area with plastic sheeting and painter’s tape. Change your furnace filter after the project ends, and use a filter rated MERV 8 or higher. Running the system while dust is airborne pulls fine particles into the ducts, where they can recirculate through the house for weeks.
What protective equipment should I wear when cleaning renovation dust?
Wear an N95 respirator, safety glasses, and nitrile gloves during any dry cleanup. Drywall dust contains silica particles that irritate airways and eyes, and fine dust stays airborne long after you stop sweeping. If you have asthma or allergies, stay out of the work zone entirely and let a professional crew handle the final cleaning.
How often should I clean during a home renovation?
Clean the work area at the end of every workday and wipe high-traffic paths in occupied rooms once daily. A HEPA vacuum and damp microfiber cloths handle most surfaces. Weekly, wash curtains, upholstered furniture covers, and any bedding that sits near the containment barrier. Regular cleaning stops dust from building up on surfaces where it can be stirred back into the air.
How long does renovation dust last after the project ends?
Loose dust settles within a few days, but fine particles trapped in ducts, carpet, and upholstery can recirculate for several weeks. Plan a final deep clean that includes HEPA vacuuming, damp wiping of walls and ceilings, and a furnace filter change. Run a portable air purifier with a HEPA filter in the renovated room for two to four weeks to catch what cleaning misses.
Managing renovation dust is a battle you win with planning, not cleanup. Most homeowners start cleaning after the dust has already spread; the smart move is containing it before the first hammer swings. KRB Development brings hands-on leadership and a real estate background to every project, with a focus on staying on time and on budget. We seal, filter, and clean as part of the build, not as an afterthought. Get a free project estimate and let us handle the dust while you enjoy the result.